February's theme was "Need for Speed", which was very well represented. There were a total of six theme and five non-theme models. New for this month was a club vote for Best Theme Build as voted on by the membership present.
The winner of February's Best Theme Build was Jim Rotramel with his AMT 1:72 XB-70A-1. Jim built his Valkyrie almost completely OOB with the exception of sourcing a couple of pilots from an SR-71 kit. Even at 1:72 scale, the Valkyrie took up quite the amount of real estate and looked very impressive. For his efforts, Jim took home an assortment of modeling clamps, donated by Chuck Connor.
Other theme builds included Nick Kessel's equally impressive 1:48 RA-5C Vigilante. Nick start with the Trumpeter kit and proceeded to add on a slew of aftermarket upgrades including an Eduard Zoom photoetched cockpit set, Aires afterburner nozzles, SAC metal nose strut and Nautilus center brace. Nick then topped it all off with markings from RVAH-13 circa 1973 from the Aeromaster sheet.
Nate Swift kept the theme builds going with his Revell 1:72 SR-71 Blackbird. Nate's "Habu" was built completely OOB.
Rounding out the airborne theme contingent, we have another OOB Revell build, the North American X-15 in 1:72 scale built by Steve Lucianetti.
Still keeping in theme for "Need for Speed", we have a Monogram 1:24 Ford Thunderbird NASCAR built by Steve Workman. Steve built this kit OOB, but added decals to represent the Sunny King Ford Thunderbird driven by Ken Schrader in 1985.
The final theme entry for February was this Tamiya 1:24 Ford Escort RS Cosworth rally car built by David Fuller. The model was built completely OOB, including kit decals. David used Tamiya spray can colors which were decanted and airbrushed. The markings represent an Escort that was sponsored by the Michelin tire company and entered in the 1994 British Rally Championships where it won 4 out of 5 races, winning the title.
Non-theme builds for February included this nicely built 1:48 Revell F-4D Phantom II brought by Adam Colvin. Aftermarket decals top off this very nice OOB build.
Joe Hegedus brought along two newly completed builds, including this very nice Eduard 1:72 F6F-3E Hellcat. Joe added a Hasegawa radar pod and propeller as well as markings to represent a Hellcat assigned to NATC Flight Test at Pax River in 1944. Could that be exhaust staining I see on there?!?
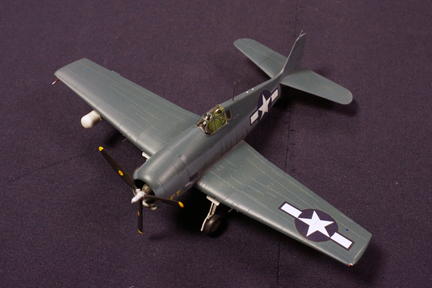
Accompanying the Hellcat was this 1:72 F4U-1A Corsair that Joe built from the Tamiya kit. The kit was built OOB with the addition of Superscale markings for VMF-122 out of Peliliu circa 1944. I'm sure that Joe has built enough of these kits that he could probably build one in his sleep!
Continuing in the "Gentleman's" scale, we have this very colorful 1:72 F4F-3 Wildcat built by Jonathan Wright. Jonathan started with the Academy kit and added Starfighter Decals.
Lastly we have a very nice 1:48 P-47D Thunderbolt that we have been watching Steve Lucianetti complete over the past few months. Steve started with the Hobbyboss kit and added Eagle Strike decals.
That's it for this month's progress report. Don't forget, the March them is "The Final Frontier" and I'm sure that we'll have some great builds coming to you from a galaxy far, far away. Stay tuned!
Tuesday, March 19, 2013
118: Progress Report
For the second month in a row, there were quite a few in progress builds at the meeting. There were three builds for February's "Need for Speed" theme, as well as six additional non-theme builds.
First up in the theme builds is this very nice Revell 1:32 Bell X-1 being built by one of our newest members, Mike Colvin. Thus far, Mike has set upon improving the old kit of the first supersonic aircraft with seatbelts made from tape as well as a nicely wired instrument panel. Mike says that he prefers to add details the old fashioned way, from bits of plastic, wire, and pretty much anything else that will fit the bill. Keep up the good work Mike!
Next up is a "twofer" theme build from Chuck Connor. Chuck's first entry is the Hasegawa 1:72 F-104 Starfighter which will eventually be done in the "Red Baron" scheme. It was in this airframe that Darryl Greenamyer set the 3km low level speed record of 988.26 MPH on 24 October 1977, a record that still stands. Pretty amazing, considering that the airframe was an amalgamation of various crashed airframes, including parts from the first production F-104A and the nose from one of the NF-104 rocket boosted airframes. Chuck's build however, is strictly OOB, with only the ejection seat requiring some modification to fit underneath the canopy.
Chuck's second build is the Tamiya 1:24 Peugeot 206 WRC (World Rally Championship) race car. These are great little kits that really build up nicely. They also provide the modeler the opportunity to either build a nice clean and shiny car as seen "prerace" or heavily weathered and damaged as typically is seen at the end of the race. We can't wait to see which way you decide to go Chuck!
Moving on to the non-theme builds, we have this recently started CH-147F Canadian Chinook by Steve Workman. Steve started with the 1:72 Italeri MH-47E kit earlier in the week. Steve plans to model this one after the 2nd CH-147F built for Canada using CH-147F currently at Pax River as well as Internet photos for references. Details in the plans will include Eduard photoetched details to offset some of the kit's deficiencies.
Tim Kelly returned to the club after an extended leave with a Trumpeter 1:700 HMS Hood, circa 1941. Tim is currently building this model OOB, and will be donating the model to the future Battle of the Atlantic display for the Pax River Museum. Good to have you back Tim!
Next up we have an Italeri 1:48 Mirage 2000C being built by Nick Kessel. Nick has been busy fitting a Black Box resin cockpit, and will soon be adding TwoBobs 2001 Tiger Meet decals and an Aires resin afterburner nozzle.
Joe Hegedus was also in attendance with a "FrankenCorsair". Joe is currently using a variety of different kits to accurately portray yet another 1:72 F4U Corsair.
Moving away from aircraft, we have a 1:35 Ki 89 Otsu Japanese medium tank that is being built by "Doc" Haugh. According to Doc, this kit is from the FineMolds "Girls and Panzer" theme, which is based upon a Japanese Anime cartoon. Apparantly, it was actually cheaper to buy this version and source correct details elsewhere, but I think Doc was just looking for some "nose art" for some of his other builds.
Last but certainly not least we have a 1:6 King Leonidas (of The 300 fame) sculpted by Vince Mankowski. Vince started with a wire coat hangar armature, which was then wrapped in aluminum foil to fill out the shape. The figure was then covered in Sculpey clay for a rough shape and then baked. The final layer is Milliput fine epoxy putty rolled into thin sheets and applied to the Sculpey frame.
That is all for in-progress builds. There is lots of promising work here, keep it up guys!
Friday, March 15, 2013
118: Spare Parts
Spare Parts
118
Odds and ends, tips and tricks, miscellaneous musings.
Be my guest!
This
edition of Spare Parts features a
guest columnist, our own Collin Tatusko. Though we've missed him at the meetings lately Collin has been a busy modeler, as you shall see. He describes some of his recent
projects and shares a bit of philosophy along the way.
If
you would like to submit an item for publication on our blog, here is how to
get it done. Send me an email with the text for the article in an attached MS
Word file. If there are pictures to be included, send them a separate jpeg file
attachments. Please do not embed the pictures in the Word file. It’s easy, as
Collin will tell you. With that, I’ll cede the rest of this month’s bandwidth
to Collin.
The
Distracted Driver Modeler
With the excitement of a kid tearing open presents on
Christmas Day or a honey badger taking down a 7-foot king cobra, we dive into a
new model on our bench with zest. Parts
are laid out, instructions are read (well not really), paints are collected and
a search for photos on the Internet and your extensive wall of books has
yielded reference material beyond compare.
Parts are snipped, sanding commences, and the build begins!! Part fit is checked and rechecked and out
comes the glue. The model takes shape
quickly. Cockpit complete, fuselage
assembled and wings attached. It
actually starts to look like a model.
Then comes the speed bump in the road. Sanding seams and rescribing. Well I will get to that, but first let me
look on the Internet and see what’s new.
Wow, look at all the new resin, and these glorious new decals sheets for
kits I don’t even have. Oh wait, lets
spend an evening reading posts that don’t even deal with modeling. Distractions.
Before you know it, you haven’t touched your model in a week. It sits down in your model cave crying like a
puppy for its mother. But you don’t hear
it because look at the sale happening at Sprue Bothers, and the discount you
don’t even understand at Squadron.
Sooner or later you realize you have neglected your “puppy”
for long enough and enter your cave. You
say you are sorry and start to get your “mojo” back and pick up where you left
off. It lasts for a few days and then
“can you pick up XYZ this afternoon?" Or
you have to travel out of town for work, or “I really need to run more because
of my cholesterol”. Life =
Distraction. Once again you leave your
“puppy” on the bench waiting.
Time goes by, and you get your motivation up again and enter
the cave to find your “puppy” still there, wagging it’s tail ready for you to
start where you left off. Maybe you
finish it this time around, maybe not.
The cycle repeats.
There are some good things about all of this, in my humble opinion.
First, the puppy will always be wagging its tail when you return no matter how long you leave it in an
unfinished state in the cave among its friends such as the sanders, the cup of
paintbrushes or half a bottle of Tenex.
Second, being a distracted modeler
has actually helped my modeling skills.
You see, one of my problems with modeling is rushing things, especially
toward the end of a build. This on and
off relationship I have with my hobby actually allows me to take my time and
step away, not rushing important steps like rushing and creating a rain drop
runny coat of Future, or blotching the decals because I just got sick of all
those F-4 Phantom stencils.
“Git-R-Done” is limited. So I
guess this is my way of saying that life distractions can actually help our
appreciation of the hobby, and improve our skill in the process.
So with that said, what has Collin been up to?
I have missed coming down to SOMD meetings, but work and
life make it difficult to get down there.
The beauty of living in DC is that I don’t have to deal with traffic (I’m already
in the city unlike folks driving in and out for work). But what can take an hour and 15 minutes to
drive (no traffic like when I come to Pax in the morning) turns into a 2-3 hour
trek in outgoing traffic (in the evening, 295 South is a parking lot). Work meetings in Pax River on the same day as
SOMD Thursdays have become rare, and Thursday nights are “date night’ with the
Mrs. We all know how we must pay respect to that. So getting down there has been tough. I may be a rough and tough guy, but I will
say without reservation that I miss the meetings.
So what have I been working on?
1/72 Hasegawa KA-3B “Electric” Skywarrior. Great kit.
Good detail, and a very quick build.
You will have the fuselage and wings together before you know it. The
fit is really good. I actually cut off
the front part of the jet pods, and filled in that inside seam. I then reattached and it looked pretty
decent. Some online builds talk about
leaving the engine pods off to facilitate painting. The leading edge merge of the wing and engine
pod isn’t that great, so I went ahead and attached the pod during initial
construction. Careful painting and a
heck of a lot of masking went into the markings (the tail black flash was all
masked). I used some old aftermarket
decals and put together a relatively accurate set of markings. Overall, a fun and out of my comfort zone
build for me.
One day I ordered decals for an orange and gray
USN F-4 Phantom, but mistakenly ordered 1/72 instead of 1/48. Bummer.
So what did Collin do? He just “had” to buy the dual boxing of the
Hasegawa F-4B-N/J kit so he could use those decals. What a grand plan! Well I pulled out one of those kits and went
to town. I just wanted something to put
in my new display case at Pax River. It's in the large conference room in Bldg 304. Check it out if
you're in the area. So I didn’t do anything crazy in the cockpit except paint it up
and dress up one ejection seat with thin wine foil seat belts. This particular test bird didn’t have a rear
ejection seat. Kit is good with very
fine detail. I lost some of that
detail around the intake area due to some ham-fisted sanding and rushing
things. I painted her up and pulled out
the international orange. Overall a
quick build for me, I just did some pre-shading on this one with no weathering
wash…Joe is rubbing off on me.
Hurricane
Sandy was a perfect excuse to head to the Man-Cave, and out came an impulse
build of the Tamiya 1/48 P-47D Razorback.
I will be blunt: if you don’t buy
this kit you are missing out on a treat.
An AWESOME kit right out of the box.
Fit was great. Detail was great…I
mean this kit was a dream. I had the kit
built and ready for paint in a week. Out
came the airbrush and I wanted to try my shaky hand at a freestyle/feathered
demarcation. I used my H&S
airbrushed to do this kit, and I think it came out OK. Some guy online gave me grief but Oh
Well. The decals are aftermarket
including the checkerboard cowling. I
was scared about that cowling. I painted
the cowling yellow and gloss coated.
After that was dry I laid out the two halves of the checkerboard and let
them lay still for a few minutes. I then
used an attack plan of Tamiya X-20A thinner and MicroSol to get them to lie down. I coated the checkerboards and then ran out
of the model room praying that when I came in the next day I didn’t have to
“Collin-ize” something. I didn’t have
to worry. The decals laid down perfectly
overnight, what you see in the pictures is what actually happened. I was blown away and very happy. Overall, on of the most fun I have had in a
while building a kit. If anyone hates
Thunderbolts and is looking to get rid of their Tamiya kits, you know my
number!
On the desk now is the ubiquitous Hasegawa 1/48 A-7E Corsair
II. I just love this aircraft. Built for one purpose…to take ordnance and
break the bad guy’s toys. Fighters have
their place, but attack is where it’s at.
This is a very detailed kit with a lot of tricky things. Of course there is the intake that I
painstaking took the time to smooth out.
That came out really well for my first attempt. The wing join area to the fuselage leaves
some sanding and filling to do. This was
my first real attempt at taking time to rescribe panel lines and lost
fasteners. With pre-shading done and the
base colors on, I am very pleased with how it’s turning out. One new item I tried for the first time
painting is Mr. Color Leveling Thinner.
This stuff is the BOMB!!! I mean
pure liquid gold. I mixed up my base
enamel white and commenced my normal fill in the panel and paint over the
pre-shade area, the white turned out smooth and without a blemish. I mean no pebble effect or anything. I was blown away. I used the same technique for the Gull Gray
for the upper surfaces (using my new Badger SOTOR 20/20 airbrush to get the tight
freehand demarcation line). Again, the
gray came out fantastic. This thinner
isn’t cheap, and I am only using it for my base color coats to conserve this
precious resource….so I still went out this week and bought the last two
remaining bottles that Amazon offered.
I’m seriously considering a multi-color camouflage scheme for my next build to
push the airbrush/thinner combo. Loadout
will be 10x MK-82 on outboard TERs, 1 x Shrike, 2 x MK-20 ROCKEYE. I pulled this loadout from the Osprey series
about this aircraft in Vietnam. Here she
is:
I hope to make the meeting the end of the month. I have a ton of books and decals for anyone
to have. Whitey already claimed the U-2R
model I don’t want anymore. And I have
those remaining tubes of Tamiya light curing putty for those who purchased
them.
Cheers
Collin
Sunday, March 3, 2013
117: The Taming Of The Sprue
As an American modeler in the UK there are many things I have get used to, and relearn.
The first is that distances here are measured in time, not miles. Oh for sure the miles are noted but mentally you can see folks are thinking in terms of time. "That's only 10 miles." Is not the same as "Oh, that's 10 miles." The first may take 15 minutes, but the latter will probably take 30. Roads here are narrow (no shoulder) and follow ancient winding cart paths that date to Roman times. The speed limit is posted as 60 mph but only a nut job with a death wish would actually try to go that fast on a single carriage way (aka 2-ish lane road).
The second lesson is that the LHS isn't. Online shops are the norm unless you are lucky enough to live near a ModelZone or major store chain that carries kits and modeling supplies. There are a few, but imagine having to go to NYC for the nearest model shop? I know...we're almost there.
The company, in its wisdom, provided me a car. They also threw in driving lessons but I think the jury's not out yet on how well that went. While it's a small car (VW Golf) it won't fit in the garages here. Not that folks use them as such; they all park on the sidewalks.
My first weekend with a car has been an interesting experience. I decided to venture out to the nearest "Hobby Shop" over in Windemere. According to Google it was about 1 hour away from my place in Gosforth via a well established road. Well, I got that wrong. Instead of going a reasonable 40 I was lucky to do 25-30 because of the winding roads along the hillsides. I cannot image that stone wall was more than an inch from my mirror as I rounded an S-turn with a bus, yes, bus, coming the other way. No touchy-touchy but I think I could see the nose-hairs of the driver. I know he saw my mouth saying a few choice words...
After taking a ferry across Lake Windemere (not on the Google route) I arrived at a quaint little tourist town focused on Beatrix Potter. Those stories were written and based in the local area. At any rate, after elbowing my car through the tourists I found parking and then ventured out to find this "Hobby Shop".
It should have been listed as a toy shop. Legos and similar types of hobbies were in there, and a few paint-by-numbers sets. Scalextric race car sets, some Hornby model train sets, but not much more. The plastic kits were limited to one shelf of Revell, all kinds and scales, and of course Revell paints, glues, and thinners; albeit not a complete stock. Okay, I think I counted 20 paints, most of which were colors that made no sense. Probably one tin for each kit on their shelf...plenty of glues, though.
So, I won't be making that trip again!
The bright side was I got some pretty good fish and chips while I was there and some great driving experience. I also learned to look for toy stores as some stock kits and glues. Paint may be a problem as the UK shippers no longer will ship them other than in bulk. I may use a lot of Sky paint, but. Don't need a gallon! Hobby shops have brushes and other materials and my hope is that a dedicated model train shop up in Carlisle will have plastic and and other tools/supplies. That's a trip for next weekend.
Until next time...thanks for reading.
Tim
Tuesday, February 19, 2013
117: Show and Tell
January's theme was "Unmanned", but that certainly didn't mean that it would be "Unattended". With six completed models and four in progress builds, this turned out to be quite a popular theme.
So popular in fact that Chuck Connor wowed the club with his superb rendition of the Academy 1:35 RQ-7B UAV as operated by the US Army. Chuck noted that other than a hypodermic tube for the pitot the rest of the kit was built OOB, although he did point out that should he build it again, he would probably replace the tail booms and landing gear with some other material as they were very flimsy. The model was painted entirely with Vallejo acrylics and then done up with the kit supplied Cartograph decals. Nice to see that Chuck still remembers which end of the paint brush goes into the jar! Can't wait to see more Chuck!
Next up is the Accurate Miniatures RQ-1 Predator built by Andy White. Andy built this popular little model OOB with markings for a unit out of Creech AFB.
Dave Fuller also brought along his rendition of the RQ-1 Predator built OOB with Wolfpak Decals markings for an example flown by the 178th RS, 119th WG "Happy Hooligans" from the North Dakota ANG.
Accompanying the RQ-1 were two MQ-9 Reapers built from the 1:72 Skunkmodels kit. Both were also built OOB with the markings being a combination of the kit supplied decals for the example flown by the US Customs and Border Patrol as well as Caracal Models decals for the Royal Air Force example belonging to RAF 38 Sqn.
Rounding out the theme builds for the month was Tim "I've Got a Spitfire for That" Holland with his Frog 1:72ish Spitfire FMK XIVe and V-1 buzz bomb display. Tim says that while the V-1 is quite a nice kit, the Spitfire is "crap". Specifically, it is too small (about 1:75) and has numerous inaccuracies.
Along with the theme build, Tim also brought along a few of the models he is working on for the Battle of the Atlantic display the club is doing for the museum, all in 1:700 scale. Dominating the scene is the Tamiya HMS Prince of Wales which Tim reports as having too many pieces that required way too much work. Good thing it wasn't a Dragon kit! Also in the photo are two U-boat models built by Tamiya (Type VII) and Hobbyboss (Type IX) as well as numerous 1:700 aircraft converted from wargaming minatures. They were unsurprisingly, easier to build than the Prince of Wales.
Moving on to dry land, we have a very nice Italeri 1:35 Italian armoured car built by "Doc" Haugh. If I am reading my decoder ring correctly, according to Doc's information sheet, it is a "Sahariana" which was built OOB, and was a "nice kit" with "no vices" (the kit, not the real thing).
Dan Yakel also brought along a very nice looking WWII armor model in his Tamiya 1:35 T-34/85. Dan added an aluminum barrel and bed spring armor. The kit rubber band tracks were replaced by ones taken from a Dragon kit to give them the proper "sagged" look.
Nick Kessel brings us back into the wild blue with his 1:48 Hasegawa F-14A Tomcat. Nick built this model for the museum's "Tophatter's" history display, and sourced the 80th Anniversary markings from Fightertown. A Wolfpack "Bombcat" update set and Hasegawa AIM-9Ms and GBU-24 round out the build. Nick says he certainly plans on building more of the Hasegawa F-14's, and I can't wait to see them. You can never have enough F-14's!
If you've been following the newsletter lately, I'm sure you have been following along as Nate Swift's SM.79 Sparviero has progressed along. Nate's model started out as the 1:72 Italeri kit to which he added Eduard PE interior and exterior details as well as new resin cowls by Quickboost. Nate applied a beautiful airbrushed finish to complete this stunning model.
Another finished build that we have been following along with is the 1:48 Mi-24 Hind F built by Jim Rotramel. Jim started with the Monogram kit and added various Cobra Company resin sets to detail the cockpit, weapons, ECM, as well as the Hind "F" gun mod. Jim also performed extensive modifications to the kit to lengthen the tail boom to the correct dimensions.
Rounding out the completed show and tell builds were these three very nice models done by Joe Hegedus. Beginning in 1:72 scale we have the Trumpeter Westland Wyvern S.4 which was built completely OOB. The model is as nice as the real thing is ugly.
Also in 1:72 scale is this nice example of "Heinemann's Hotrod". Joe started with Fujimi's excellent A-4C Skyhawk kit and added Hasegawa TERs and Zuni pods along with decals for the VA-76 MiG-Killer from the 2011 IPMS Nationals decal sheet.
Joe also brought another A-4, this time in 1:48. Starting with the Hasegawa TA-4J VT-7 Bicentennial kit, Joe added True Details resin ejection seats in an otherwise OOB build.
That's all for now folks. Next month's theme is "The Need for Speed" and we should have some great models to showcase.
117: Progress Report
At a very well attended meeting after Christmas and New Year, it is apparant that quite a few people spent their vacations finishing old builds as well as starting new ones. There were eight in progress builds alone.
Starting off with three targ..er..tank models, we have a selection of various subjects built by Dan Yakel, all in 1:35 scale. First up is Dan's M4A32 Jumbo Sherman. Dan is using a Tank Workshop turret, transmission cover, and aluminum barrel to convert the Tamiya kit.
Next we have the Dragon SU-100P which Dan is converting to a SU-122P using an Aluminum barrel, resin mantlet, Verlinden engine compartment with lots of copper wire and PE detailing.
Switching to an Axis subject, Dan also brought along his Dragon Jagdpanther. While waiting for PE parts for the hull, Dan managed to fight his way through the very complex suspension assembly.
Andy White brought along his current project, a 1:32 Tamiya P-51D Mustang. The engine and interior work look fantastic and really need to be seen in person. Can't wait to see the finished product!
January's theme was "Unmanned", and there were quite a few theme builds, including these four that are still "In Progress".
First we have Steve Workman's Accurate Miniatures 1:72 Predator UAV that Steve plans on building Out Of the Box (OOB).
Jim Rotramel also brought along a 1:72 MQ-1B Predator, albeit from the later Platz boxing. This has also been an OOB build that only needs decals and Hellfire missiles to be finished.
Accompanying Jim's MQ-1B was this MQ-9 Reaper built from the Skunkmodels 1:72 kit. Like the Predator, this model only needs decals, Hellfire missiles, and GBU-12s.
Dave Fuller rounded out the in progress builds with his Academy 1:35 RQ-7 drone.
Remember guys, August is Amnesty month!

Next we have the Dragon SU-100P which Dan is converting to a SU-122P using an Aluminum barrel, resin mantlet, Verlinden engine compartment with lots of copper wire and PE detailing.
Switching to an Axis subject, Dan also brought along his Dragon Jagdpanther. While waiting for PE parts for the hull, Dan managed to fight his way through the very complex suspension assembly.
Andy White brought along his current project, a 1:32 Tamiya P-51D Mustang. The engine and interior work look fantastic and really need to be seen in person. Can't wait to see the finished product!
January's theme was "Unmanned", and there were quite a few theme builds, including these four that are still "In Progress".
First we have Steve Workman's Accurate Miniatures 1:72 Predator UAV that Steve plans on building Out Of the Box (OOB).

Accompanying Jim's MQ-1B was this MQ-9 Reaper built from the Skunkmodels 1:72 kit. Like the Predator, this model only needs decals, Hellfire missiles, and GBU-12s.
Dave Fuller rounded out the in progress builds with his Academy 1:35 RQ-7 drone.
Remember guys, August is Amnesty month!
Sunday, February 17, 2013
117: Spare Parts
Spare
Parts
117
Odds
and ends, tips and tricks, miscellaneous musings.
What’s
in it for me?
“It’s
a fun hobby.” “It helps me relax.” It’s a great stress relief.” If you ask a
modeler why he is a modeler you’ll probably get one of those answers, or
something along that line. Despite the wide variety of personalities (or lack
of personality) and backgrounds that make up the population of the scale
modeling world, we all do it for basically the same reason. Now, if you take
fifty modelers and ask each of them what their favorite modeling activity is,
you’ll get a hundred different answers.
There are many aspects to the scale modeling hobby, lots of genres in a variety of scales. There are disciplines that our little group does not address, like model railroading and RC. We do have some members who engage in those activities and we certainly don’t hold that against them, even if they are into RC cars. Right, Jon?
Some modelers specialize in a particular genre and scale, like 1/72 aircraft, 1/35 armor, or 1/24 cars. Then there are modelers who live in the moment and will build something just because it looks cool or unusual, regardless of the scale or category. Some modelers enjoy the research aspect of the hobby and can cite the most arcane historical details of their current project. Some modelers aren’t satisfied until every last panel line is exactly right and will tell another modeler when they aren’t. Others build out of the box and when the glaring, egregious errors are pointed out they shrug and say, “It looks like a (insert subject here) to me”.
Then there is the build process itself. Going from opening the box to putting a finished model on the table is a long, sometimes endless process. Just like the modeling hobby, the model building process is multifaceted. There is the initial cleaning up and assembly of the parts. Parts are joined to form sub-assemblies, which in turn are joined together in the final assembly steps. You may or may not add aftermarket or scratch built details along the way. Usually seams need to be filled and cleaned up. Parts and assemblies need to be prepared for paint and then painted, and decals are applied. Then comes the application of washes, dry brushing, filters, and pigments to achieve the desired weathering effects. Again, if you ask fifty modelers what is their favorite part of the build you’ll get a hundred different answers.
Some model clubs are
specialized. I belong to a model car club and some of our members belong to RC
flying clubs. There are armor model clubs, figure model clubs, and railroad
model clubs. I think that one of the neat things about our club is that it is not specialized. The variety of modeling
experience and expertise leads to some spirited discussions at our meetings. It
also leads to some interesting comments that we can learn from. For example, I
never realized that a modeler who would scratch build details for a 1/144 scale
aircraft cockpit would need “… to have his head examined”, or that building
link-to-link tracks for a tank is “… the definition of insanity.” What I have
learned from such comments is that everyone has an opinion and people will
frequently have differing opinions. It’s a matter of choice.
Which
brings us to the overarching reason that every one of us is a modeler. It’s a
matter of personal choice, actually an iterative series of choices.
First one decides to be a modeler, then decides what kind of models to build and how to build them. Of course those decisions change as one evolves, learns, and grows as a modeler. So, what is the answer to the question that brought
on this musing? I’ve always been a proponent of Socratic pedagogy, so I’m going
to answer the question with a question:
What do you want?
(NOTE: If you don’t know what “Socratic
pedagogy” is, look it up. But be careful, you might learn something!)
Chuck
Subscribe to:
Posts (Atom)